Register your site on the Google reCAPTCHA website (https://www.google.com/recaptcha) and get the site and secret key, then use it with CodeIgniter 4 forms to protect against spam.
Here are some steps to integrate and use Google reCAPTCHA v2 to secure forms:
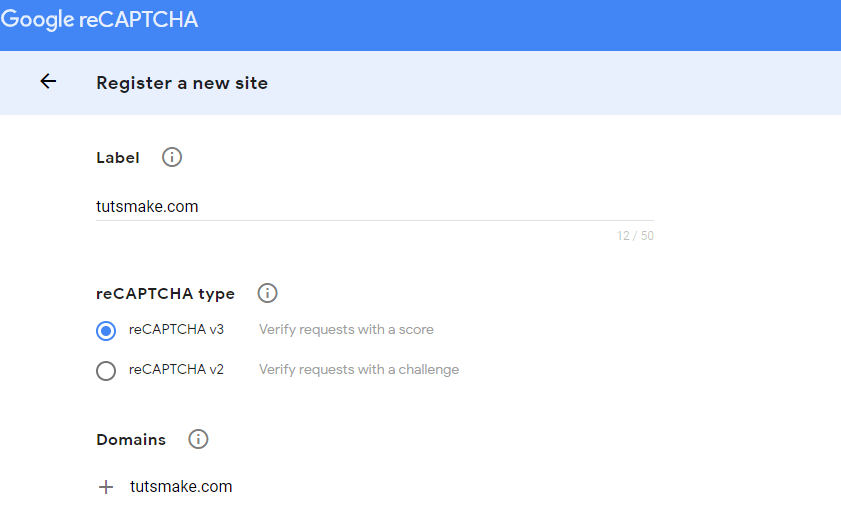
First of all, you need to create new Google reCaptcha key and secret for codeigniter 4 application. Follow all the below steps for creating google reCaptcha key or secret. Click here for creating a google reCaptcha key or secret. When you will click the given link, the below form open in your browser. Now fill this form and get your key and secret.

You will submit the above form after that you will be get google reCaptcha secret_site and secret_key.

Now, copy this important key and secret.
Step 1: Setup Codeigniter 4 Project
In this step, you will download the latest version of Codeigniter 4, Go to this link https://codeigniter.com/download Download Codeigniter 4 fresh new setup and unzip the setup in your local system xampp/htdocs/ . And change the download folder name “demo”
Step 2: Basic Configurations
Next, you will set some basic configuration on the app/config/app.php file, so let’s go to application/config/config.php and open this file on text editor.
Set Base URL like this
public $baseURL = 'http://localhost:8080';
To
public $baseURL = 'http://localhost/demo/';
Step 3: Create Table in Database
In this step, you need to create table in database for codeiginter 4 app. So visit your phpmyadmin panel and execute the following sql query in it:
CREATE TABLE users (
    id int(11) NOT NULL AUTO_INCREMENT COMMENT 'Primary Key',
    name varchar(100) NOT NULL COMMENT 'Name',
    email varchar(255) NOT NULL COMMENT 'Email Address',
    contact_no varchar(50) NOT NULL COMMENT 'Contact No',
    created_at varchar(20) NOT NULL COMMENT 'Created date',
    PRIMARY KEY (id)
  ) ENGINE=InnoDB DEFAULT CHARSET=latin1 COMMENT='datatable demo table' AUTO_INCREMENT=1;
Step 4: Setup Database Credentials
In this step, you need to connect our project to the database. you need to go app/Config/Database.php and open database.php file in text editor. After opening the file in a text editor, you need to set up database credentials in this file like below.
	public $default = [
		'DSN'      => '',
		'hostname' => 'localhost',
		'username' => 'root',
		'password' => '',
		'database' => 'demo',
		'DBDriver' => 'MySQLi',
		'DBPrefix' => '',
		'pConnect' => false,
		'DBDebug'  => (ENVIRONMENT !== 'production'),
		'cacheOn'  => false,
		'cacheDir' => '',
		'charset'  => 'utf8',
		'DBCollat' => 'utf8_general_ci',
		'swapPre'  => '',
		'encrypt'  => false,
		'compress' => false,
		'strictOn' => false,
		'failover' => [],
		'port'     => 3306,
	];
Step 5: Create Controller
In this step, Visit app/Controllers and create a controller name GoogleReCaptcha.php. In this controller, you need to add the following methods into it:
<?php namespace App\Controllers;
use CodeIgniter\Controller;
use CodeIgniter\HTTP\RequestInterface;
use App\Models\UserModel;
class GoogleReCaptcha extends Controller
{
    public function index(){
      return view('home');
    }
    public function googleCaptachStore() {
      $model = new UserModel();
      $data = array('name' => $this->request->getVar('name'),
                    'email' => $this->request->getVar('email'),
                    'contact_no' => $this->request->getVar('mobile_number'),
                   );

      $recaptchaResponse = trim($this->request->getVar('g-recaptcha-response'));

      $userIp=$this->request->ip_address();

      $secret='ENTER_YOUR_SECRET_KEY';

      $credential = array(
            'secret' => $secret,
            'response' => $this->request->getVar('g-recaptcha-response')
        );
      $verify = curl_init();
      curl_setopt($verify, CURLOPT_URL, "https://www.google.com/recaptcha/api/siteverify");
      curl_setopt($verify, CURLOPT_POST, true);
      curl_setopt($verify, CURLOPT_POSTFIELDS, http_build_query($credential));
      curl_setopt($verify, CURLOPT_SSL_VERIFYPEER, false);
      curl_setopt($verify, CURLOPT_RETURNTRANSFER, true);
      $response = curl_exec($verify);
      $status= json_decode($response, true);

      if($status['success']){
       $model->save($data);
       $session->setFlashdata('msg', 'Form has been successfully submitted');
      }else{
       $session->setFlashdata('msg', 'Something goes to wrong');
      }

      return redirect()->to('/');
    }
}
Step 6: Create Form in View
In this step, you need to create one view files name home.php and update the following code into your file:
<!doctype html>
<html lang="en">
  <head>
  <meta charset="utf-8">
  <meta name="viewport" content="width=device-width, initial-scale=1, shrink-to-fit=no">
  <title>Codeigniter Google Recaptcha Form Validation Example - Tutsmake.com</title>
  <link rel="stylesheet" href="https://maxcdn.bootstrapcdn.com/bootstrap/4.0.0/css/bootstrap.min.css" integrity="sha384-Gn5384xqQ1aoWXA+058RXPxPg6fy4IWvTNh0E263XmFcJlSAwiGgFAW/dAiS6JXm" crossorigin="anonymous">
  <script src="https://code.jquery.com/jquery-3.2.1.slim.min.js" integrity="sha384-KJ3o2DKtIkvYIK3UENzmM7KCkRr/rE9/Qpg6aAZGJwFDMVNA/GpGFF93hXpG5KkN" crossorigin="anonymous"></script>
  <script src="https://cdnjs.cloudflare.com/ajax/libs/popper.js/1.12.9/umd/popper.min.js" integrity="sha384-ApNbgh9B+Y1QKtv3Rn7W3mgPxhU9K/ScQsAP7hUibX39j7fakFPskvXusvfa0b4Q" crossorigin="anonymous"></script>
  <script src="https://maxcdn.bootstrapcdn.com/bootstrap/4.0.0/js/bootstrap.min.js" integrity="sha384-JZR6Spejh4U02d8jOt6vLEHfe/JQGiRRSQQxSfFWpi1MquVdAyjUar5+76PVCmYl" crossorigin="anonymous"></script>
  <script src='https://www.google.com/recaptcha/api.js'></script>
  <style>
   .error{ color:red; }
  </style>
</head>

<body>
<div class="container">
    <div class="error"><strong><?=$this->session->flashdata('msg')?></strong></div>
    <br>
    <br>
    <div class="row">
    <div class="col-md-9">
    <form  method="post" action="<?php echo base_url('google/googleCaptachStore') ?>">
      <div class="form-group">
        <label for="formGroupExampleInput">Name</label>
        <input type="text" name="name" class="form-control" id="formGroupExampleInput" placeholder="Please enter name">
      </div>
      <div class="form-group">
        <label for="email">Email Id</label>
        <input type="text" name="email" class="form-control" id="email" placeholder="Please enter email id">
      </div>
      <div class="form-group">
        <label for="mobile_number">Mobile Number</label>
        <input type="text" name="mobile_number" class="form-control" id="mobile_number" placeholder="Please enter mobile number" maxlength="10">
      </div>

      <div class="g-recaptcha" data-sitekey="YOUR_SITE_KEY"></div>

      <div class="form-group">
       <button type="submit" id="send_form" class="btn btn-success">Submit</button>
      </div>
    </form>
    </div>
    </div>

</div>
</body>
</html>
Step 7: Create Google Recaptcha V2 Route
In this step, you need to create a route that renders the table into the view, place the following code in app/Config/Routes.php file.
$routes->get('/', 'GoogleReCaptcha::index');
Step 8: Start Development Server
Run the following command to start application server:
php spark serve
Go to the browser and hit below the URL:
http://localhost:8080
Conclusion
Codeigniter 4 integrate google reCaptcha example. Here you have learned how to integrate google reCaptcha with form in php codeigniter 4 app.
If you have any questions or thoughts to share, use the comment form below to reach us.