If you are a regular WordPress user like me, then you must know how annoying you feel when you get the error message – ” uploaded file exceeds the upload_max_filesize directive in php.ini. wordpress ” when you are trying upload something really serious!
Uploaded file exceeds the upload_max_filesize directive in php.ini. Ubuntu
Recently, I encountered new error message that actually tells you to increase the upload memory limit!
I’m adding the error message in a style box below.
This File is empty. Please upload something more substantial. This error could also be caused by uploads being disabled in your php.ini or by post_max_size being defined as smaller than upload_max_filesize in php.ini.
How to Increase Max File Upload Size in WordPress Ubuntu?
Basically, this happen for WordPress security. By default WordPress does not allow you to upload large file size to prevent hacking problem & unwanted site damage.
This also can cause earlier bandwidth exceeds problem as well. So, WordPress engineers decreased the file upload limit. Sometimes, your hosting company also prevent uploading large file sizes.
This has both advantages & disadvantages as well. Though, disadvantages are nearly negligible & you can easily overcome this issue, but using alternative ways.
Pros
- Ensure Security of Your Website
- Prevent Harm Code Injecting
- Prevent Unwanted Bandwidth Exceeds
- Stop Showing Error – “Taking Too Much Time to Upload”
- Check the File Properly Before Upload It.
Cons
- Prevent to Upload Large File Upload That is Annoying
- Memory Limit is Too Short!
- Needs Technical Knowledge to Increase Memory Limit
- Bibendum ispum dolor elit
How to Solve The uploaded file exceeds the upload_max_filesize directive in php.ini?
You can follow either way or test multiple method to solve this issue. Sometimes one method does not work, but another works!
Depending on various hosting provider & WordPress version, you need to test below mentioned methods.
- Using a WordPress Plugins
- Updating php.ini File
- Updating wp-config.php File
- Edit .htaccess File
- Edit functions.php File
- Contact Your Hosting Provider
If you are getting below errors while uploading files on your WordPress Website, you can follow this video tutorial.
- upload max file size wordpress plugin
- wordpress maximum upload file size 2mb
- maximum upload file size 2 mb wordpress
- exceeds the maximum upload size for this site. wordpress
- increase max upload size wordpress wp-config
- how to increase maximum upload file size in cpanel
- increase maximum upload file size in wordpress localhost
- increase upload size wordpress godaddy
Some other CMS ( Content Management System ) users also experience this issue on their websites. Basically, this happens for php.ini problem on hosting accounts.
- the uploaded file exceeds the upload_max_filesize directive in php.ini. localhost
- the uploaded file exceeds the upload_max_filesize directive in php.ini. cpanel
- the uploaded file exceeds the upload_max_filesize directive in php.ini. ubuntu
- the uploaded file exceeds the upload_max_filesize directive in php.ini. mamp
- the uploaded file exceeds the upload_max_filesize directive in php.ini. moodle
- the uploaded file exceeds the upload_max_filesize directive in php.ini. plesk
- warning: the uploaded file exceeds the upload_max_filesize directive in php.ini! opencart
- the file you uploaded exceeds 1m
Here are My Listed Solutions For You!
#1 Using WordPress Plugins
If you are a non-coder & afraid of editing hosting files like me!
I suggest you to use WordPress Plugins to solve “The uploaded file exceeds the upload_max_filesize” problem efforlessly.
This is also a clever way to solve your problem & avoid all sensitive WordPress Files.
Because editing sensitive files can damage your website sometimes and you can add wrong codes that could be harmful as well.
As a huge WordPress fan, I am using WordPress for last 6 years and Working as Pro WordPress Developer that enhanced my knowledge about WordPress features & add-ons.
In my cases, I use “Increase Maximum Upload File Size” or “Upload Larger Plugins” WordPress plugins to solve upload file size exceeds error.
So, I suggest you to try both of this plugins on your website first, before you jump to edit sensitive files.
Plugins to Solve The uploaded file exceeds the upload_max_filesize
#2 Updating php.ini File
Most of the cPanel hosting use PHP coding to develop the management system. You will find a file called php.ini that will help you bindings of uploading larger files on your website.
You need to add below lines by editing your php.ini file.

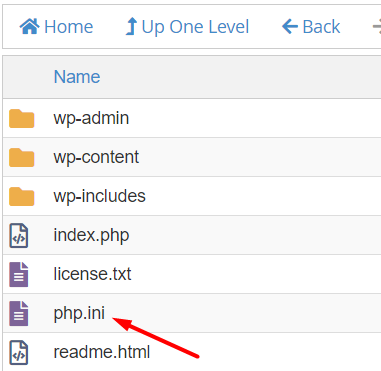
Figure 1
upload_max_filesize = 25M
post_max_size = 13M
memory_limit = 15M
You will find the php.ini file on your hosting under the WordPress installation directory ( Check Figure 1 ). Open the file in the Text Editor & add the lines from the above box.
In case you don’t find the ini.php file on your WordPress Directory, you can create one, add the codes & upload it to WP Installation Directory.
Create New php.ini File
Once you update the file, try to reupload your file on WordPress. If you still get the error notice, move forwar & try the method.
#3 Updating wp-config.php File
Wp-config.php is a core file of WordPress that cotains some important information & instruction of your website. Here you can easily define the upload limit on your website. You will find the wp-config.php file on the same directory where the php.ini located.
Open the file on Text Editor & add below lines at the bottom of your wp-config.php file.
@ini_set( 'upload_max_size' , '24M' );
@ini_set( 'post_max_size', '13M');
@ini_set( 'memory_limit', '15M' );
or you can add below line instead of above one.
define('WP_MEMORY_LIMIT', '256M');
Save the file & try to upload files on your WordPress site again. Hope this will solve the issue. Or you can try next method.
#4 Edit .htaccess File
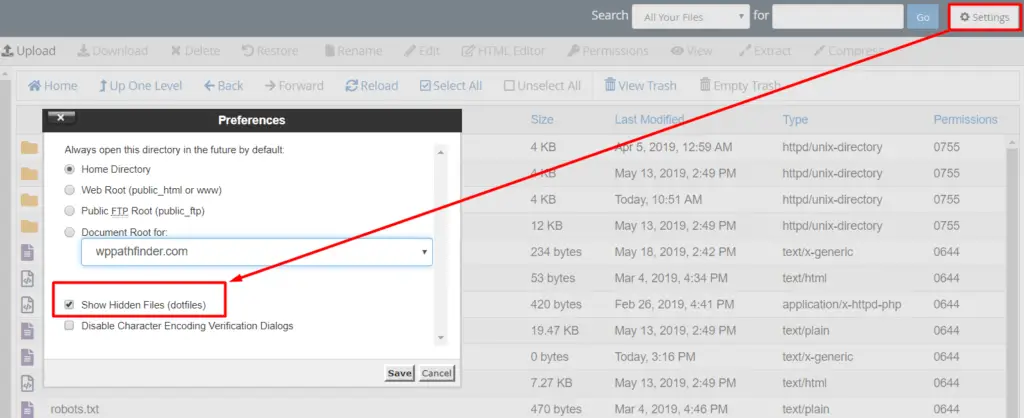
To edit .htaccess file you need to navigate the WordPress installation directory again and make sure all of your server hidden files are visible. You can do this just clicking setting icon on the top right corner and check “Show Hidden Files” option.

Once you save the option, you will find all the hidden files visible including the .htaccess file. So, you need to edit the file using Text Editor & add following lines from below box.
php_value upload_max_filesize 64M
php_value post_max_size 128M
php_value memory_limit 256M
php_value max_execution_time 300
php_value max_input_time 300
You can modify the sizes in Megabytes. Suppose you can change 64M to 128M depending on your requirement. Also, you can increase the execution time & input time to avoid errors for time delay on large file uploads.
#5 Edit functions.php File
If you are not too much Tech Expert, I suggest you not to edit WordPress core files like wp-config.php & .htaccess file.
Rather, it will be clever way to update your WordPress theme files. Because, you can easily change your theme & restore any damage using the theme backup.
Because, you always have theme backup & it’s less harmful for your website. You can easily recover your website if anything bad happen!
So, I suggest you to navigate the WordPress Theme installation folder & edit the theme function file.
you will find it inside the theme folder. Just select the right theme that is currently active & you will notice the file “functions.php”.
Your next step is open the file in a Text Editor & add below lines on function file on your theme.
The actual path is “wp-content>themes>ActiveTheme>functions.php“.
Once you find the file, edit it & add below lines on it.
@ini_set( 'upload_max_size' , '64M' );
@ini_set( 'post_max_size', '64M');
@ini_set( 'max_execution_time', '300' );
Your problem should be solved at this stage. But if you don’t get the solution, you should try the next way.
#6 Contact Your Hosting Provider
If you are not that much expert to solve the issue by implementing above ways, you have then two options available!
- Contact Hosting Support Center
- Hire an Expert