Laravel 7/6 Google ReCaptcha – Here you will learn how you can integrate google v2 Re Captcha form validation (security) in your laravel application forms.
Today we will integrate google Re Captcha in the laravel application. We will create one form using google Re Captcha and before store data into the database, we will verify the form data using laravel validations.
In this google Re captcha tutorial, we will complete all steps and after that, we will provide a live demo button. Click the live demo button and test this laravel google Recaptcha integration.
Laravel Google V2 Re Captcha Form Validation
To google Re Captcha validation in laravel. follow the below steps and you can validate form data with google v2 reCaptcha validation.
- Step 1: Download laravel Fresh Setup
- Step 2: Setup Database Credentials
- Step 3: Install Google Captcha Package
- Step 4: Get Google Captcha Secrets
- Step 5: Create Route
- Step 6: Generate Controller by Command
- Step 7: Create Blade View (form)
- Step 8: Run Development Server
Step 1: Download laravel Fresh Setup
First We need to download fresh laravel setups. Use the below command to download the laravel fresh setup on your system.
composer create-project --prefer-dist laravel/laravel blog
Step 2: Setup Database Credentials
After successfully download laravel 6 Application, Go to your project .env file and set up database credential and move next step :
  DB_CONNECTION=mysql
  DB_HOST=127.0.0.1
  DB_PORT=3306
  DB_DATABASE=here your database name here
  DB_USERNAME=here database username here
  DB_PASSWORD=here database password here
Step 3: Install Google Captcha Package
Now We will Install the Google Captcha Package in your laravel 6 application. Use the below command and install this package in your laravel application.
composer require anhskohbo/no-captcha
After successfully Install Google Captcha Packages, open config/app.php file and add service provider and alias.
 config/app.php


 'providers' => [


 Anhskohbo\NoCaptcha\NoCaptchaServiceProvider::class


 ],


 'aliases' => [


 'NoCaptcha' => Anhskohbo\NoCaptcha\Facades\NoCaptcha::class,


 ]
Step 4: Get Google Captcha Secrets
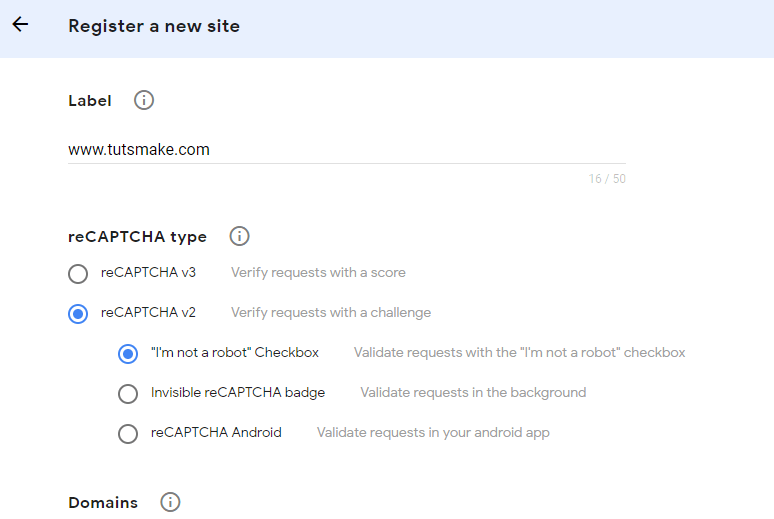
Now I will create google Recaptcha site_key and secret_key for showing the Recaptcha in laravel application. If you have already site_key and secret_key, so you need to put the .env file. If you don’t know where we will get secret_key and secret_site click below the link and create your own secret credentials. Recaptcha new site registration
When you click this link Recaptcha new site registration you will see the form look like. Here fill all the details and submit the form.

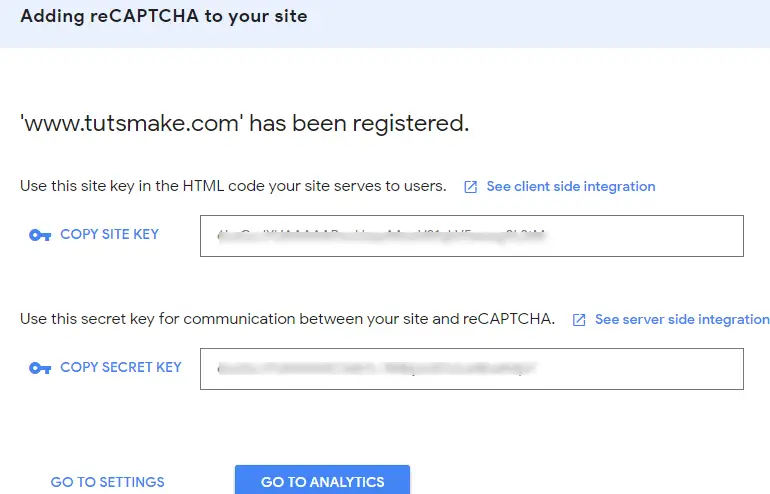
You will submit the above form after that you will see your secret_site and secret_key, Copy your credentials here and put your .env file

After that, we will set the google captcha secret in .env files, let’s open .env file and add this credentials here :
 NOCAPTCHA_SITEKEY=secret_site_key
 NOCAPTCHA_SECRET=secret_key
Step 5: Create Route
Now We will add two routes in the web.php file as below. The first is showing form and second is store form data into the database.
Open routes/web.php file
 Route::get('captcha-form', 'CaptchaController@captchForm');
 Route::post('store-captcha-form', 'CaptchaController@storeCaptchaForm');
Step 6: Generate Controller by Command
We need to create new controller CaptchaController that will manage two methods. lets use this below command and create a Controller.
php artisan make:controller CaptchaController
Now open the controller let’s go to the => app/Http/Controllers/CaptchaController.php. Now create some methods for showing and storing data into a database.
<?php

namespace App\Http\Controllers;

use Illuminate\Http\Request;
use Validator,Redirect,Response;
use App\User;

class CaptchaController extends Controller
{
    public function captchaForm()
    {
       return view('captchaform');
    }
    public function storeCaptchaForm(Request $request)
    {
        request()->validate([
        'name' => 'required',
        'email' => 'required',
        'mobile_number' => 'required',
        'g-recaptcha-response' => 'required|captcha',
        ]);

        dd('successfully validate');
    }
}
Step 7: Create Blade View
Next, create a captchaform.blade.php file in resources/views/ folder and copy-paste the following code.
<!doctype html>
<html lang="en">
  <head>
  <meta charset="utf-8">
  <meta name="viewport" content="width=device-width, initial-scale=1, shrink-to-fit=no">
  <meta name="csrf-token" content="{{ csrf_token() }}">
  <title>laravel 6 Google Recatpcha Verification - Tutsmake.com</title>
  <link rel="stylesheet" href="https://cdnjs.cloudflare.com/ajax/libs/twitter-bootstrap/4.1.3/css/bootstrap.min.css" />
  <script src="//ajax.googleapis.com/ajax/libs/jquery/1.9.1/jquery.js"></script>
  <script src="https://cdnjs.cloudflare.com/ajax/libs/jquery-validate/1.19.0/jquery.validate.js"></script>
  <script src="https://cdnjs.cloudflare.com/ajax/libs/jquery-validate/1.19.0/additional-methods.min.js"></script>
  <style>
   .error{ color:red; }
  </style>
</head>

<body>

<div class="container">
    <h2 style="margin-top: 10px;" class="text-center">laravel 6 Google Recatpcha Verification - <a href="https://www.tutsmake.com" target="_blank">TutsMake</a></h2>
    <br><br><br>
    <div class="row justify-content-center">
    <div class="col-md-8">
    <a href="https://www.tutsmake.com/laravel-5-8-v2-google-recaptcha-integration" class="btn btn-secondary">Back to Post</a>
    <br><br>

    @if ($message = Session::get('success'))
    <div class="alert alert-success alert-block">
        <button type="button" class="close" data-dismiss="alert">×</button>
          <strong>{{ $message }}</strong>
    </div>
    <br>
    @endif

    <form id="captcha-form" method="post" action="{{url('store-captcha-form')}}">
      @csrf
      <div class="form-group">
        <label for="formGroupExampleInput">Name</label>
        <input type="text" name="name" class="form-control" id="formGroupExampleInput" placeholder="Please enter name">
        <span class="text-danger">{{ $errors->first('name') }}</span>
      </div>
      <div class="form-group">
        <label for="email">Email Id</label>
        <input type="text" name="email" class="form-control" id="email" placeholder="Please enter email id">
        <span class="text-danger">{{ $errors->first('email') }}</span>
      </div>
      <div class="form-group">
        <label for="mobile_number">Mobile Number</label>
        <input type="text" name="mobile_number" class="form-control" id="mobile_number" placeholder="Please enter mobile number">
        <span class="text-danger">{{ $errors->first('mobile_number') }}</span>
      </div>
      <div class="form-group">
        <label for="captcha">Captcha</label>
          {!! NoCaptcha::renderJs() !!}
          {!! NoCaptcha::display() !!}
        <span class="text-danger">{{ $errors->first('g-recaptcha-response') }}</span>
      </div>
      <div class="form-group">
       <button type="submit" class="btn btn-success">Submit</button>
      </div>
    </form>
</div>
</div>
</div>

</body>
</html>
Step 8: Run Development Server
We need to start the development server. Use the php artisan serve command and start your server :
 php artisan serve
 If you want to run the project diffrent port so use this below command
 php artisan serve --port=8080
Now we are ready to run our example so run bellow command to quick run.
 http://localhost:8000/
 Or direct hit in your browser
 http://localhost/blog/public/captcha-form
Conclusion
In this laravel google ReCaptcha tutorial, We have successfully created google Recaptcha credentials (secret_site and secret_key). After that, we have successfully integrated google Recaptcha in laravel based application.
You may like
- Laravel | jQuery Form Validation Tutorial with Demo Example
- Form Validation Example In Laravel
- Laravel Ajax Form Submit With Validation Tutorial
If you have any questions or thoughts to share, use the comment form below to reach us.
i have not my website on hosting, does i can uses google recaptcha?