Laravel 9 JWT API authentication example. In this tutorial, we will learn how to build the rest APIs with jwt (JSON web token) authentication in laravel 9 and call this apis in postman. As well as will show you how to install jwt auth and configure jwt auth in laravel 9 app.
Laravel 9 REST API Authentication with JWT Token (JSON Web Token)
Follow the below-given step and learn how to build REST APId with laravel 9 using JWT token (JSON Web Token) from scratch:
- Step 1: Download Laravel 9 App
- Step 2: Database Configuration
- Step 3: Install JWT Auth
- Step 4: Registering Middleware
- Step 5: Run Migration
- Step 6: Create APIs Route
- Step 7: Create JWT Auth Controller
- Step 8: Now Test Laravel REST API in Postman
Step 1: Download Laravel 9 App
First of all, Open command prompt and run the following command to install laravel 9 app:
composer create-project --prefer-dist laravel/laravel blog
Step 2: Database Configuration
Then, Navigate root directory of your installed laravel restful authentication api with jwt tutorial project. And open .env file. Then add the database details as follow:
 DB_CONNECTION=mysql
 DB_HOST=127.0.0.1
 DB_PORT=3306
 DB_DATABASE=here your database name here
 DB_USERNAME=here database username here
 DB_PASSWORD=here database password here
Step 3: Install JWT Auth
In this step, run the below command and install composer require tymon/jwt-auth package :
composer require tymon/jwt-auth
After successfully install laravel jwt, register providers. Open config/app.php . and put the bellow code :
  // config/app.php

'providers' => [
….
'Tymon\JWTAuth\Providers\JWTAuthServiceProvider',
],
'aliases' => [
….
'JWTAuth' => 'Tymon\JWTAuth\Facades\JWTAuth',
'JWTFactory' => 'Tymon\JWTAuth\Facades\JWTFactory',
],
Now, you need to install laravel to generate jwt encryption keys. This command will create the encryption keys needed to generate secure access tokens:
php artisan jwt:generate
then open JWTGenerateCommand.php file and paste this following code, Hope it will work.
vendor/tymon/src/Commands/JWTGenerateCommand.php
public function handle() {

  $this->fire();

}
Step 4: Registering Middleware
JWT auth package comes up with middleware that we can use. Register auth.jwt middleware in
app/Http/Kernel.php
protected $routeMiddleware = [

    'auth.jwt' => 'auth.jwt' => 'Tymon\JWTAuth\Middleware\GetUserFromToken',

];
Step 5: Run Migration
In this step, you need to do migration using the below command. This command creates tables in the database :
php artisan migrate
Step 6: Create APIs Route
In this step, you need to create rest API routes for laravel restful authentication APIs with jwt project.
So, navigate to the routes directory and open api.php. Then update the following routes into api.php file:
use App\Http\Controllers\API\JWTAuthController;

Route::post('register', [JWTAuthController::class, 'register']);
Route::post('login', [JWTAuthController::class, 'login']);

Route::group(['middleware' => 'auth.jwt'], function () {

    Route::post('logout', [JWTAuthController::class, 'logout']);

});
Step 7: Create JWT Auth Controller
In this step, you need to create a controller name JWTAuthController. Use the below command and create a controller :
php artisan make:controller Api\JWTAuthController
After that, you need to create some methods in JWTAuthController.php. So navigate to app/http/controllers/API directory and open JWTAuthController.php file. After that, update the following methods into your JWTAuthController.php file:
<?php

namespace App\Http\Controllers\API;

use JWTAuth;
use Validator;
use App\Models\User;
use Illuminate\Http\Request;
use Tymon\JWTAuth\Exceptions\JWTException;
use Symfony\Component\HttpFoundation\Response;

class JwtAuthController extends Controller
{
    public $token = true;

    public function register(Request $request)
    {

         $validator = Validator::make($request->all(),
                      [
                      'name' => 'required',
                      'email' => 'required|email',
                      'password' => 'required',
                      'c_password' => 'required|same:password',
                     ]);

         if ($validator->fails()) {

               return response()->json(['error'=>$validator->errors()], 401);

            }


        $user = new User();
        $user->name = $request->name;
        $user->email = $request->email;
        $user->password = bcrypt($request->password);
        $user->save();

        if ($this->token) {
            return $this->login($request);
        }

        return response()->json([
            'success' => true,
            'data' => $user
        ], Response::HTTP_OK);
    }

    public function login(Request $request)
    {
        $input = $request->only('email', 'password');
        $jwt_token = null;

        if (!$jwt_token = JWTAuth::attempt($input)) {
            return response()->json([
                'success' => false,
                'message' => 'Invalid Email or Password',
            ], Response::HTTP_UNAUTHORIZED);
        }

        return response()->json([
            'success' => true,
            'token' => $jwt_token,
        ]);
    }

    public function logout(Request $request)
    {
        $this->validate($request, [
            'token' => 'required'
        ]);

        try {
            JWTAuth::invalidate($request->token);

            return response()->json([
                'success' => true,
                'message' => 'User logged out successfully'
            ]);
        } catch (JWTException $exception) {
            return response()->json([
                'success' => false,
                'message' => 'Sorry, the user cannot be logged out'
            ], Response::HTTP_INTERNAL_SERVER_ERROR);
        }
    }

    public function getUser(Request $request)
    {
        $this->validate($request, [
            'token' => 'required'
        ]);

        $user = JWTAuth::authenticate($request->token);

        return response()->json(['user' => $user]);
    }
}
Then open a command prompt and run the following command to start development server:
php artisan serve
Step 8: Now Test Laravel REST API in Postman
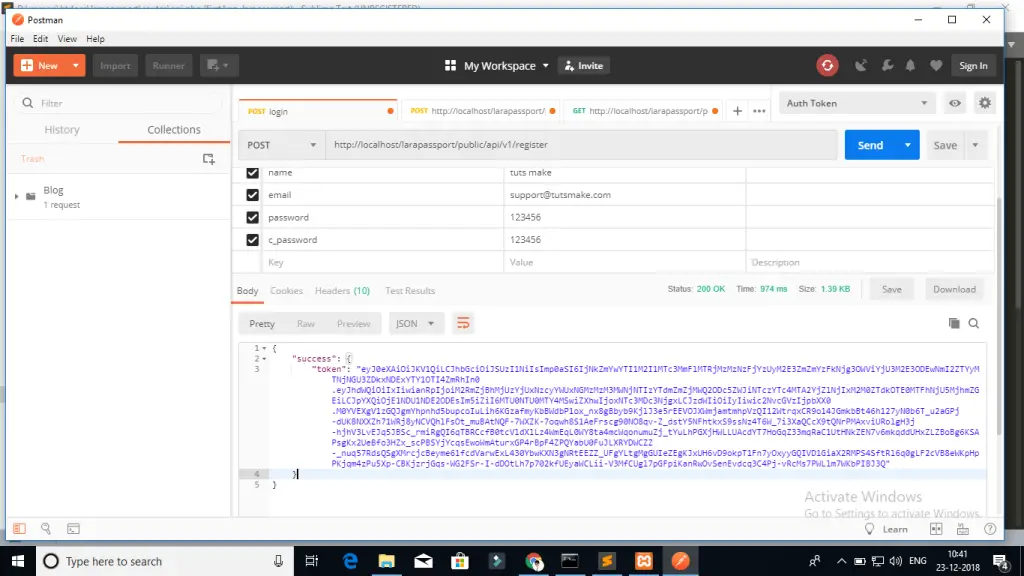
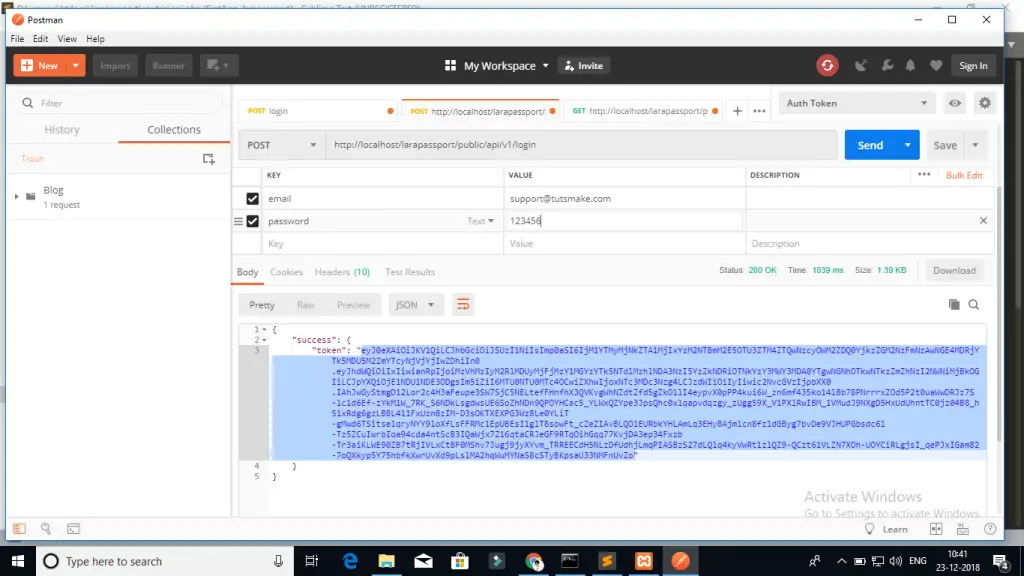
Here, you can see that, how to call laravel 9 restful API with jwt authentication:
Laravel Register Rest API :

Login API :

Next Step, you will call getUser API, In this API you have to set two headers follows:
 Call login or register apis put $accessToken.

 ‘headers’ => [
 ‘Accept’ => ‘application/json’,
 ‘Authorization’ => ‘Bearer ‘.$accessToken,

 ]
Pass header in login/register rest API. it is necessary to jwt authentication in laravel app
Conclusion
Laravel 9 restful APIs with jwt auth tutorial, you have learned how to build rest APIs with jwt auth in laravel 9 app. And as well as how to call this APIs on postman app.
Recommended Laravel Tutorials
If you have any questions or thoughts to share, use the comment form below to reach us.