In this tutorial, you will learn how to create a LinkedIn login authentication in node js express js using passport js.
LinkedIn Login using Node JS Express and passport
Steps to create a login in node js express:
Step 1: Install Node Express JS Setup
In this step, run the following command on cmd to create project directory:
mkdir LinkedinAuth
Use the following command to enter your LinkedinAuth app directories:
cd LinkedinAuth
Now, run the following command on cmd to install express, ejs, express-session and passport:
npm init -y
npm install express ejs express-session passport passport-linkedin-oauth --save
Step 2: Import Packages and routes
In this step, you need to create a file app.js in the root folder of your app and add the following code:
const express = require('express');
const app = express();
const session = require('express-session');
const passport = require('passport');
const LinkedInStrategy = require('passport-linkedin-oauth2').Strategy;
const routes = require('./routes.js');
const config = require('./config')
app.set('view engine', 'ejs');
app.use(session({
  resave: false,
  saveUninitialized: true,
  secret: 'SECRET'
}));
app.use(passport.initialize());
app.use(passport.session());
passport.serializeUser(function (user, cb) {
  cb(null, user);
});
passport.deserializeUser(function (obj, cb) {
  cb(null, obj);
});
passport.use(new LinkedInStrategy({
  clientID: config.linkedinAuth.clientID,
  clientSecret: config.linkedinAuth.clientSecret,
  callbackURL: config.linkedinAuth.callbackURL,
  scope: ['r_emailaddress', 'r_liteprofile'],
}, function (token, tokenSecret, profile, done) {
  return done(null, profile);
}
));
app.use('/', routes);
const port = 3000;
app.listen(port, () => {
  console.log('App listening on port ' + port);
});
Now create a file named route.js in the root directory and paste the following code
const passport = require('passport');
const express = require('express');
var router = express.Router();
router.get('/', function (req, res) {
  res.render('pages/index.ejs'); // load the index.ejs file
});
router.get('/profile', isLoggedIn, function (req, res) {
  res.render('pages/profile.ejs', {
    user: req.user // get the user out of session and pass to template
  });
});
router.get('/auth/linkedin', passport.authenticate('linkedin', {
  scope: ['r_emailaddress', 'r_liteprofile'],
}));
router.get('/auth/linkedin/callback',
  passport.authenticate('linkedin', {
    successRedirect: '/profile',
    failureRedirect: '/login'
  }));
router.get('/logout', function (req, res) {
  req.logout();
  res.redirect('/');
});
function isLoggedIn(req, res, next) {
  if (req.isAuthenticated())
    return next();
  res.redirect('/');
}
module.exports = router;
Step 3: Create views
In this step, you need to create directory name pages. So, visit the views directory in your app and create the pages directory.
Inside the pages/ direcotry, you need to create two views file. The views file is the following:
- index.ejs
- profile.ejs
Application-folder/viwes/pages/index.js
Now, open your index.ejs file and update the following code into your file:
<!doctype html>
<html>
<head>
  <title>Linkedin Node Authentication</title>
  <link href="https://fonts.googleapis.com/icon?family=Material+Icons" rel="stylesheet">
  <link rel="stylesheet" href="https://maxcdn.bootstrapcdn.com/font-awesome/4.7.0/css/font-awesome.min.css">
  <link rel="stylesheet" type="text/css"
    href="https://cdnjs.cloudflare.com/ajax/libs/materialize/0.97.5/css/materialize.min.css">
  <style>
    .linkedin {
      background-color: #0073b1 !important;
      color: #fff !important;
    }
    .fa-linkedin-f:before,
    .fa-linkedin:before {
      content: "\f0e1";
    }
  </style>
</head>
<body>
  <nav class="light-blue lighten-1" role="navigation">
    <div class="nav-wrapper container">
      <a id="logo-container" href="#" class="brand-logo">Node Authentication</a>
    </div>
  </nav>
  <div class="section no-pad-bot" id="index-banner">
    <div class="container">
      <br><br>
      <div class="row center">
        <div class="col s6 offset-s3">
          <div class="card">
            <div class="card-content">
              <span class="card-title">Linkedin Login using Node and passport</span>
            </div>
            <div class="card-action">
              <a href="/auth/linkedin" class="waves-effect waves-light btn social linkedin">
                <i class="fa fa-linkedin"></i> Sign in with Linkedin
              </a>
            </div>
          </div>
        </div>
      </div>
    </div>
  </div>
</body>
</html>
This index.ejs file contains login form.
Application-folder/viwes/pages/profile.js
Next, open your profile.ejs file and update the following code into your file:
<!doctype html>
<html>
<head>
  <title>LinkedIn Node Authentication</title>
  <link href="https://fonts.googleapis.com/icon?family=Material+Icons" rel="stylesheet">
  <link rel="stylesheet" type="text/css"
    href="https://cdnjs.cloudflare.com/ajax/libs/materialize/0.97.5/css/materialize.min.css">
  <style>
    .card:hover {
      box-shadow: 0 10px 20px rgba(0, 0, 0, 0.19), 0 6px 6px rgba(0, 0, 0, 0.23);
      margin-bottom: 54px;
    }
  </style>
</head>
<body>
  <nav class="light-blue lighten-1" role="navigation">
    <div class="nav-wrapper container">
      <a id="logo-container" href="#" class="brand-logo">Node Authentication</a>
      <a href="/logout" class="right">Logout</a>
    </div>
  </nav>
  <div class="section no-pad-bot" id="index-banner">
    <div class="container">
      <br><br>
      <div class="row center">
        <div class="col s12">
          <div class="card">
            <div class="card-content blue lighten-3">
              <span class="card-title white-text"><strong><i class="large material-icons">person</i>
                </strong></span>
            </div>
            <div class="card-action">
              <h5><b><%= user.displayName %></b></h5>
              <p><strong>Linkedin id</strong>: <%= user.id %></p>
            </div>
          </div>
        </div>
      </div>
    </div>
  </div>
</body>
</html>
Step 4: Create Config.js
In this step, you need to config.js file in the root directory. Then add the following code into it:
module.exports = {
  'linkedinAuth': {
    'clientID': '<CLIENT_ID>', // your App ID
    'clientSecret': '<CLIENT_SECRET>', // your App Secret
    'callbackURL': 'http://127.0.0.1:3000/auth/linkedin/callback'
  }
}
If you do not know how to get client id and secret of Linkedin app from Linkedin Developer Console, then you can create Linkedin App in Linkedin Developer Console by following the steps given below.
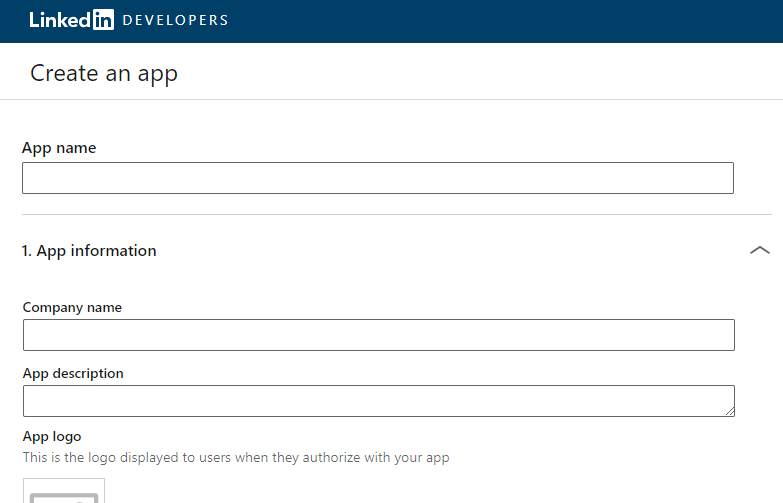
Step 1:- create linkedin app by click the following url :- https://www.linkedin.com/developers/apps/new . And create linkedin app.
When you click the above given url the following below page will be displayed. So fill the details and create your linkedin app:

Step 2:- After successfully create the app set the redirect URL for example :

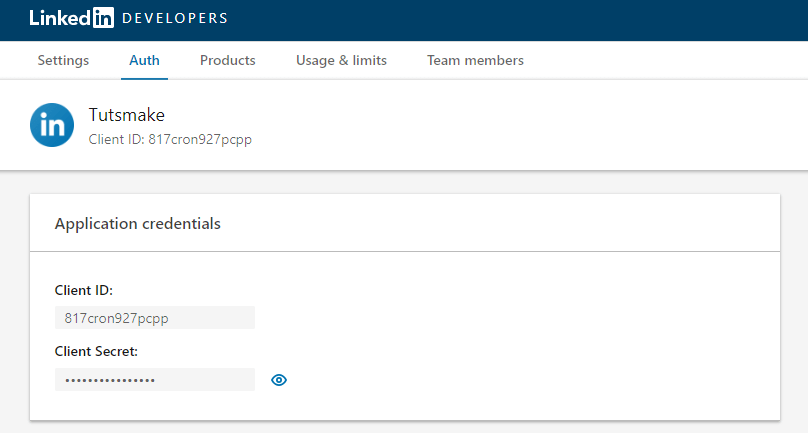
Step 3:- Finally, you redirect to dashboard by linkedin.com. So you can copy client id and secret from linkedin app dashboard like following picture:

Now linkedin app has been created successfully.
Step 5: Test Linkedin Login Application
You can use the following command to run the development server:
//run the below command

npm start

after run this command open your browser and hit

http://127.0.0.1:3000
OR
http://localhost:3000
Conclusion
In this node express js LinkedIn auth login example tutorial. You have learned how to create LinkedIn authentication in node js express with passport.